When I first discovered the world of candle making, I quickly realized how rewarding and therapeutic this craft can be. Homemade candle making for beginners is more than just melting wax and pouring it into a jar—it’s an art form that combines creativity, relaxation, and practicality. Over the years, I’ve seen countless people fall in love with this hobby because it gives them the freedom to design candles that reflect their personal style and scent preferences.
For beginners, the beauty of homemade candle making lies in its simplicity. You don’t need a huge investment or a professional studio to start. With the right supplies, some patience, and a little guidance, you can create candles that are both beautiful and functional. Whether you’re making them for personal use, as gifts, or eventually to sell, the process is incredibly satisfying.
In this guide, I’ll walk you through the essentials that every beginner should know. I’ll share insights not just from a technical standpoint but also from my experience in crafting candles for weddings and special events. By the end, you’ll feel confident enough to create your first candle and avoid the common mistakes beginners often make.
Why Choose Homemade Candle Making?
Homemade candle making has become increasingly popular, and for good reason. Many people are drawn to the idea of crafting something with their own hands, especially in a world where so much is mass-produced. When I recommend candle making to beginners, I always highlight how this craft allows for creativity while being surprisingly cost-effective.
Store-bought candles can be expensive, especially those marketed as luxury or eco-friendly. By making your own, you can control the ingredients and save money in the process. For example, I’ve made elegant soy candles for weddings that cost a fraction of the price compared to what couples would have paid for high-end retail options. The savings add up quickly, especially if you plan to create candles regularly.
Another reason many beginners turn to homemade candle making is the customization it offers. You can experiment with different scents, colors, and designs to create candles that truly reflect your personality or match a specific theme. For wedding decorations, I often design candles that complement the event’s color palette and floral arrangements. The ability to personalize candles this way is something you’ll never find with store-bought options.
There’s also a sense of fulfillment in knowing that you’ve created something meaningful with your own hands. Lighting a candle you made yourself brings a different kind of joy—it’s personal, intentional, and rewarding. This emotional connection is often what keeps beginners motivated to continue improving their craft.
Essential Candle Making Supplies for Beginners
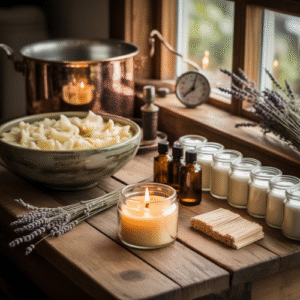
One of the most common questions I hear from beginners is: what do I need to start making candles? Having the right supplies will not only make the process smoother but also help you avoid frustration along the way. Let me walk you through the essentials you should gather before you begin.
The first and most important material is the wax. As a beginner, you’ll come across several types, including soy wax, beeswax, and paraffin. Soy wax is one of my top recommendations because it’s eco-friendly, burns cleanly, and is easy to work with. Beeswax, on the other hand, is a natural option with a delightful honey-like aroma, though it can be a bit trickier to handle. Paraffin is more affordable and widely available, but it doesn’t appeal to those looking for a natural alternative.
Next are wicks, which play a vital role in how well your candle burns. Wicks come in different sizes and materials, and choosing the right one depends on the type and size of candle you’re making. For example, container candles require a different wick size than taper candles. I always advise beginners to buy wick sample kits to test what works best for their chosen wax and container.
You’ll also need containers or molds. Jars, tins, and heat-resistant glasses are perfect for container candles, while silicone molds or metal molds are used for shaped candles. The choice often depends on your style. Personally, I enjoy using simple glass jars because they create a timeless look and allow the candle’s color and texture to shine through.
Fragrance oils or essential oils are another essential component. This is where you can let your creativity shine by blending scents to create a signature aroma. Beginners often start with familiar scents like lavender, vanilla, or citrus, but the options are limitless. Adding colorants or dyes is optional, but it’s a fun way to match your candles to your décor or event theme.
Finally, you’ll need a few basic tools: a double boiler or microwave-safe container for melting wax, a thermometer to ensure the wax reaches the right temperature, a pouring pot, and stir sticks. These tools make the process safer and more precise, especially when working with fragrance and color.
Understanding Different Types of Homemade Candles
When beginners start exploring candle making, they often think there’s just one type of candle to create. In reality, there are several types, and each comes with its own charm and purpose. Understanding the differences can help you decide which style to try first.
Container candles are by far the most beginner-friendly option. These are poured into jars, tins, or heatproof containers, which makes them safe and easy to use. They are also versatile, allowing you to experiment with different scents and colors without worrying about the structural integrity of the candle.
Pillar candles, on the other hand, stand on their own without a container. They require molds and a bit more technique, but they can create a dramatic effect when used as centerpieces. I’ve designed countless pillar candles for wedding receptions, and they never fail to add an elegant glow to the tables.
Tea lights are another popular choice for beginners. These small, round candles are typically made in metal or plastic cups and are perfect for creating soft, ambient lighting. They are quick to make and can be produced in batches, which makes them ideal if you’re planning to decorate for an event.
Taper candles are tall and slender, often used in candlesticks for formal dining or ceremonies. They are slightly more advanced to make because they require dipping or specialized molds, but they are worth trying once you gain confidence. For weddings, I often use taper candles to add height and sophistication to table décor.
Wax melts are another fun option for beginners who want to enjoy fragrance without a flame. These are small pieces of scented wax that are melted in warmers. They’re simple to create and offer endless opportunities for experimenting with fragrance blends.
Exploring these different types of homemade candles will help you decide what suits your needs and style. As a beginner, I recommend starting with container candles and branching out once you’ve mastered the basics.
Safety Tips Every Beginner Should Know
Whenever I introduce beginners to homemade candle making, I always start with safety. Working with hot wax, open flames, and fragrance oils requires careful attention. I’ve seen too many people rush into the process without understanding the risks, and that often leads to accidents or wasted materials. With a few simple precautions, you can keep the experience enjoyable and safe.
The first and most important rule is to never leave melting wax unattended. Wax can overheat quickly, and once it reaches its flashpoint, it can catch fire. This is why I always keep a thermometer nearby to monitor the temperature. Staying focused and present during the process will keep your workspace safe.
Proper ventilation is another essential safety measure. Fragrance oils, when heated, can release strong fumes. While I enjoy working with scents, I make sure the room is well-ventilated by opening windows or using a small fan. This prevents the air from becoming overwhelming and keeps the environment comfortable.
You should also prepare your workspace before you start. I recommend covering your table with newspaper or parchment paper to catch drips and spills. Keep a damp cloth and a fire extinguisher close by, just in case. These small steps might seem unnecessary at first, but they provide peace of mind and allow you to focus on creating instead of worrying about what could go wrong.
Finally, be mindful when handling finished candles. Always trim the wick to about a quarter inch before lighting to prevent excessive smoke or soot. Teach this habit to anyone you gift candles to—it makes a big difference in how cleanly and safely a candle burns.
Step-by-Step Guide: How to Make Your First Candle
Now that you understand the importance of safety, it’s time to create your very first candle. This is the part I love the most because it transforms a collection of simple supplies into something beautiful and personal. While there are many techniques, I’ll walk you through a reliable beginner-friendly process.
Start by preparing your workspace. Set out your container, wick, wax, fragrance, and tools so everything is within reach. I’ve learned that organization makes the process smoother and prevents mistakes. Secure your wick in the center of the container using either a wick sticker or a small dab of melted wax. Keep it upright with a wick holder or by placing two chopsticks across the top of the container.
Next, melt your wax. If you’re using a double boiler, fill the bottom pot with water and place the wax in the top pot. Heat slowly and stir occasionally until the wax reaches the recommended melting temperature. If you prefer the microwave method, melt the wax in short intervals, stirring between each. A thermometer will help ensure that the wax is not overheated.
Once melted, remove the wax from heat and allow it to cool slightly. This cooling period is important because adding fragrance oil when the wax is too hot can cause the scent to weaken. I usually wait until the wax is around 120–140°F before adding fragrance. Stir gently but thoroughly to distribute the scent evenly. If you want to add dye, this is the stage to do it.
Now you’re ready to pour. Carefully pour the wax into your prepared container, holding the wick steady as you work. Pour slowly to reduce air bubbles and avoid spilling. Leave a small amount of wax in your pot for a second pour in case the candle develops sinkholes as it cools.
Allow the candle to cool and harden completely, which may take several hours. If you notice any imperfections, reheat the leftover wax and top off the surface. Once the candle is set, trim the wick to about a quarter inch. Your candle is now ready to use or gift. Lighting it for the first time is always rewarding—it’s proof that you’ve successfully created something from scratch.
Common Beginner Mistakes and How to Avoid Them
Even with the best instructions, beginners often run into issues with their first few candles. I’ve made these mistakes myself in the early days, and I’ve seen countless beginners struggle with the same challenges. Knowing what to expect will help you avoid frustration and learn more quickly.
One of the most common problems is tunneling. This happens when a candle burns straight down the middle, leaving unused wax around the edges. The key to avoiding tunneling is the first burn. Allow the candle to burn long enough for the entire surface to melt into a full wax pool. For most container candles, this means at least two to three hours.
Another issue is uneven burning, which usually comes from using the wrong wick size. A wick that’s too small won’t create enough heat to melt the wax properly, while a wick that’s too large can cause excess smoke and soot. I always recommend testing different wicks to find the perfect match for your wax and container.
Fragrance throw, or the strength of your candle’s scent, is another common frustration. If your candle doesn’t smell as strong as you expected, it might be because the fragrance oil wasn’t added at the right temperature or wasn’t measured correctly. Beginners often underestimate how much oil is needed, so follow the manufacturer’s guidelines closely.
Lastly, beginners sometimes rush the curing process. Candles, especially soy-based ones, benefit from curing for a few days before burning. This allows the fragrance to bind with the wax, resulting in a stronger scent throw. I know it’s tempting to light your candle right away, but patience will give you much better results.
Learning from these common mistakes is part of the journey. With each candle you make, you’ll gain more experience and confidence, and the quality of your creations will improve.
Creative Ideas to Personalize Your Homemade Candles
Once you’ve mastered the basics of candle making, it’s time to explore your creativity. What I love most about homemade candle making is that no two candles need to look the same. Beginners often start simple, but adding personal touches is where this craft truly shines.
Layered candles are one way to make your creations stand out. By pouring different colors of wax in stages, you can create a striped effect that looks stunning when lit. I’ve made layered candles for weddings that matched the couple’s theme colors, and they became both décor and conversation pieces.
Another popular trend is decorating candles with dried flowers, herbs, or spices. Embedding lavender sprigs or rose petals into a clear gel candle creates a natural, elegant look. Just remember to keep decorations away from the wick so they don’t become a fire hazard. This technique works beautifully for gifts and adds a handmade charm that store-bought candles lack.
Scent blending is another area where you can experiment. Instead of sticking to a single fragrance, try combining complementary scents. For instance, vanilla pairs well with sandalwood, and citrus blends beautifully with mint. Creating your own signature fragrance is one of the most rewarding aspects of candle making.
Don’t forget the containers themselves. Unique jars, vintage teacups, or even coconut shells can become candle holders. When I design candles for events, I often choose containers that fit the overall aesthetic—rustic weddings call for mason jars, while elegant celebrations may use crystal glasses. The container can transform a simple candle into a centerpiece.
Troubleshooting Guide for Homemade Candles
Even experienced candle makers occasionally face issues, so having a troubleshooting mindset is important. Beginners often feel discouraged when their candles don’t look perfect, but most problems are easy to fix with a little practice.
One common issue is cracking on the surface of the candle. This usually happens when the wax cools too quickly. To avoid it, let your candles cool at room temperature rather than placing them in the fridge or near a draft. A slower cooling process produces a smoother finish.
Sinkholes are another challenge. These are small cavities that appear around the wick as the candle hardens. The solution is to keep a little wax aside for a second pour. Once the candle has partially cooled, pour the leftover wax on top to fill in the gaps.
If you notice wet spots on glass containers, don’t worry—it’s a cosmetic issue rather than a functional one. This happens when wax pulls away from the glass as it cools. While it can be hard to prevent entirely, preheating the container slightly before pouring can help reduce the effect.
Fragrance fading is another frustration. If your candle doesn’t smell as strong after curing, it might be because too little fragrance oil was used or the wax type doesn’t hold scent well. Soy wax, for example, requires careful balancing of temperature and oil measurement. Adjusting your ratios and experimenting with different oils will usually solve this problem.
Eco-Friendly and Sustainable Candle Making
As more people become eco-conscious, beginners often ask me how they can make their candles sustainable. I always encourage starting with natural waxes like soy, beeswax, or coconut wax, which are renewable and burn cleanly compared to paraffin.
Reusing jars and containers is another simple yet effective step. Instead of buying new ones each time, clean and recycle old candle jars, or repurpose household containers. Not only does this reduce waste, but it also adds character to your creations.
Choosing non-toxic fragrance oils and natural essential oils is another eco-friendly choice. While synthetic fragrances can be appealing, natural options are safer and better for the environment. Pair them with cotton or wood wicks that are free from metal cores for a cleaner burn.
Even the packaging can be sustainable. When gifting or selling homemade candles, I recommend using recycled paper, compostable wraps, or biodegradable labels. Small choices like these can make your candle-making practice environmentally friendly and align with growing consumer demand for sustainable products.
Beginner-Friendly Candle Recipes to Try
Sometimes the hardest part for beginners is deciding what to make first. To make it easier, here are a few simple recipes that never fail to impress.
A lavender soy candle is a great starting point. Use soy wax, a cotton wick, and a few drops of lavender essential oil. The calming fragrance makes this candle perfect for relaxation or bedtime.
For something a little sweeter, try a vanilla coconut candle. The combination of vanilla fragrance oil and coconut wax creates a warm, comforting scent that feels luxurious yet beginner-friendly.
If you want to explore beeswax, start with a honeycomb taper candle. Beeswax sheets can be rolled around a wick to form a beautiful candle without melting wax at all. This method is quick, simple, and perfect for beginners who want to experiment with a natural material.
These recipes not only give you hands-on practice but also result in candles that you’ll be proud to use or gift.
How to Turn Candle Making Into a Small Business
Many beginners eventually wonder if their hobby could become a source of income. I’ve guided couples and individuals who started by making candles for personal use and later launched successful small businesses.
The first step is to refine your skills and develop a few signature products. Focus on quality and consistency, as these are what set homemade candles apart in a competitive market. Once you have reliable recipes, consider your branding. The name, packaging, and presentation of your candles will influence how customers perceive them.
Selling platforms like Etsy, local craft fairs, and farmers’ markets are excellent places to start. Social media can also play a powerful role in reaching potential customers. Sharing behind-the-scenes photos of your candle-making process builds trust and creates a personal connection with your audience.
Pricing is often the most challenging part for beginners. You’ll need to account for the cost of materials, time, and packaging, while also ensuring your prices remain competitive. I usually advise starting with a small profit margin and adjusting as your business grows.
FAQs About Homemade Candle Making for Beginners
How long does it take to make a candle? On average, the process takes a few hours, but curing can take anywhere from two days to two weeks, depending on the wax.
How much does it cost to start candle making? Beginners can usually gather all the essential supplies for under $50, making it an affordable hobby to try.
What’s the best wax for beginners? Soy wax is my top recommendation because it’s forgiving, eco-friendly, and provides excellent scent throw when used correctly.
Do I need special equipment? No, most beginners can start with basic tools from the kitchen. However, investing in a thermometer and a pouring pot makes the process easier and safer.
Can homemade candles really replace store-bought ones? Absolutely. With the right supplies and practice, homemade candles often outperform commercial options in both quality and personalization.
Conclusion
Homemade candle making for beginners is a journey that combines creativity, practicality, and a touch of artistry. From choosing your materials and learning safety practices to experimenting with scents and designs, every step offers something new to discover. I’ve seen beginners grow from hesitant first attempts to confident makers who create candles that rival professional products.
What makes this craft so fulfilling is the personal connection you form with each creation. Every candle tells a story—whether it’s a relaxing lavender candle for quiet evenings, a vibrant layered candle for special celebrations, or a rustic beeswax taper for a wedding.
If you’ve been thinking about trying homemade candle making, now is the perfect time to begin. With patience, practice, and a willingness to experiment, you’ll not only create candles you love but also gain a skill that can bring joy for years to come.