As someone who has decorated countless weddings, I have learned that the smallest details often make the biggest impact. Candles, in particular, hold the power to transform a space from simple to enchanting. When I discovered the beauty of soy candles, I quickly realized they were not just elegant, but also sustainable and versatile. Over the years, I have incorporated DIY soy candles into wedding centerpieces, ceremony backdrops, and even as thoughtful favors for guests.
The reason I recommend soy candles, especially for those who want to create them at home, is simple: they are affordable, customizable, and remarkably easy to make with the right guidance. In this article, I will take you step by step through the candle-making process. My aim is to not only show you how to make them but also to inspire you to see their potential in weddings and special occasions. Whether you are making them for your big day, as gifts, or simply to enjoy a cozy glow at home, you’ll find the process rewarding and the results beautiful.
Before we dive into the step-by-step process, it’s important to understand what makes soy candles stand out. By knowing their unique benefits, you’ll appreciate why I always recommend them to brides, grooms, and anyone who loves the warmth of candlelight.
What Makes Soy Candles Different From Other Candles?
Having worked with all types of candles in my career, I can confidently say that not all candles are created equal. Soy candles are made from soy wax, which comes from natural soybean oil. Unlike paraffin candles, which are derived from petroleum, soy candles are a much cleaner option. This means when they burn, they produce less soot, making them ideal for indoor use and perfect for wedding venues that demand elegance without mess.
Another detail I often emphasize to couples is the burn time. Soy candles burn slower and more evenly than many traditional candles. This not only gives you more hours of beautiful candlelight but also ensures your decorations remain intact throughout the event. I cannot tell you how many times I’ve relied on soy candles to maintain a soft glow during hours-long wedding receptions. Their long-lasting nature makes them reliable, which is a quality every decorator values.
And of course, there’s the customization factor. Soy wax holds fragrance well, allowing you to infuse candles with scents that match your wedding theme or personal preference. I’ve designed weddings where lavender-scented soy candles filled the reception hall, creating an atmosphere that was both calming and unforgettable. You won’t find that same versatility with many other types of candles.
Benefits of Making Your Own Soy Candles
One of the most rewarding aspects of making your own soy candles is the ability to tailor every detail. When I guide couples who want to include candles in their celebration, I always highlight how DIY soy candles can reflect their unique story. From choosing the container to selecting the scent, each candle becomes a personal expression.
The eco-friendly nature of soy wax is another reason I often recommend it. Many brides and grooms today are mindful of sustainability, and soy candles fit perfectly into that vision. They are biodegradable and derived from renewable resources, which aligns beautifully with weddings that prioritize greener choices. As someone who believes that décor should not only look stunning but also feel meaningful, soy candles always align with my values.
There’s also the practical side. Store-bought candles, especially decorative ones, can be surprisingly expensive. By making your own, you reduce costs while gaining complete creative control. I have seen couples save hundreds of dollars by making their own soy candle centerpieces, and the results often looked more beautiful than anything they could have purchased ready-made.
Lastly, there is something deeply fulfilling about creating candles yourself. When I first began experimenting with DIY soy candles, I was surprised at how therapeutic the process felt. The act of melting wax, adding fragrance, and carefully pouring into containers became almost meditative. For many of my clients, making candles before their wedding turned into a bonding activity, bringing them closer as they prepared for their special day together.
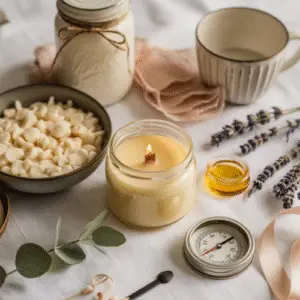
Essential Materials and Tools You’ll Need
Now that you understand why soy candles are such a wonderful choice, it’s time to talk about what you’ll need to start. Over the years, I’ve curated a reliable list of materials and tools that make the candle-making process smoother and more enjoyable. Having the right supplies on hand is essential because it ensures each step flows seamlessly.
First and foremost, you’ll need soy wax flakes. These are widely available online or in craft stores, and I always recommend choosing high-quality wax to ensure a clean burn. The next must-have is a candle wick. When selecting wicks, it’s important to consider the size of your container. A wick that’s too small won’t burn properly, while one that’s too large can create excessive smoke. From experience, I’ve learned that cotton or wood wicks both work beautifully with soy wax.
You’ll also need fragrance oils or essential oils, depending on your preference. I often lean toward natural essential oils for weddings, as they create a soft, elegant aroma that enhances the atmosphere without overwhelming it. Lavender, eucalyptus, and vanilla are among my favorites because they pair so well with romantic settings.
In terms of tools, a double boiler is essential for melting the wax. If you don’t own one, you can easily create a makeshift version with a heat-safe bowl placed over a pot of simmering water. A thermometer is also helpful, as soy wax has an ideal pouring temperature that ensures the best results.
Finally, don’t forget your containers. These can be as simple or as elaborate as you like. Mason jars, glass votives, or even teacups can all make charming vessels for your candles. I’ve styled weddings where candles in mismatched vintage teacups became the highlight of the table décor, sparking endless compliments from guests. Your choice of container adds character and can tie beautifully into your overall wedding theme.
Step-by-Step Guide: How to Make DIY Soy Candles
When I teach couples or individuals how to make their own soy candles, I emphasize that the process is straightforward but benefits from patience and attention to detail. Each step builds upon the last, and with the right guidance, you’ll find yourself enjoying the process as much as the final result.
The first step is preparing your workspace and containers. I always suggest choosing a clean, clutter-free area where you can focus on your craft without distractions. Lay down newspaper or parchment paper to catch any accidental spills. Position your containers on the surface before you begin melting the wax. This way, everything is within easy reach when it’s time to pour. Preparing in advance prevents last-minute scrambling, which can lead to mistakes or uneven results.
Once your space is ready, measure your soy wax. A simple rule of thumb I often use is to double the volume of the container when calculating how much wax you’ll need. For instance, if your container holds one cup of liquid, you’ll want to measure two cups of soy wax flakes. This ensures you’ll have enough melted wax to fill the vessel completely, as the flakes reduce significantly once melted.
The next step is melting the soy wax. This is where your double boiler comes into play. Place the soy wax flakes into the top pot or bowl and allow the steam from the boiling water beneath to melt the wax gently. Avoid direct heat, as it can scorch the wax and affect the quality of your candle. Stir occasionally to encourage even melting. From my experience, patience here pays off—rushing the melting process can cause lumps or uneven texture in the finished candle.
Once the wax is fully melted, it’s time to add fragrance. This is one of my favorite parts because it allows you to personalize each candle. Whether you’re drawn to calming lavender, refreshing citrus, or cozy vanilla, the scent transforms your candle into something uniquely yours. I recommend adding the fragrance once the wax has cooled slightly but is still liquid—typically around 120 to 140 degrees Fahrenheit. This ensures the fragrance binds well without evaporating too quickly. Stir slowly and thoroughly so the scent distributes evenly throughout the wax.
If you’d like to add color to your candles, this is the stage to do it. I often advise clients to use dye chips or liquid dyes specifically formulated for candle-making. Natural alternatives, such as beetroot powder or turmeric, can also give subtle, earthy hues. Keep in mind that less is more—start with a small amount, as you can always add more for a deeper color. Personally, I prefer keeping soy candles in their natural creamy tone for weddings, as it complements most décor themes without overpowering the aesthetic.
Now, focus on setting the wick. Place the wick at the center of your container and secure it in place. Wick stickers or a dab of hot glue work well to anchor the wick at the bottom. To keep the wick upright as you pour the wax, use a wick holder, a clothespin, or even two pencils laid across the top of the container. A well-centered wick is essential for an even burn, so take a few moments to adjust it properly.
With everything prepared, carefully pour the melted wax into your containers. Pour slowly to avoid creating air bubbles, and leave about half an inch of space at the top. One trick I’ve learned is to pour in two stages. Start by filling the container almost to the top, allow it to cool slightly, and then top it off with the remaining wax. This helps create a smooth surface and minimizes imperfections.
After pouring, let the candles cool at room temperature. Avoid moving them around, as this can disturb the wax and cause uneven surfaces. Cooling may take a few hours, depending on the size of the container. Once the wax has hardened completely, trim the wick to about a quarter of an inch. This length is ideal for burning, as it reduces smoke and ensures a steady flame.
The final step is curing the candles. While you can technically light them as soon as they’ve cooled, I always recommend letting soy candles rest for at least 24 to 48 hours. This curing period allows the fragrance to bind fully with the wax, resulting in a richer scent throw when you eventually light the candle. For weddings, I often prepare candles weeks in advance to give them time to cure properly, ensuring they perform beautifully on the big day.
Tips for Achieving the Perfect Soy Candle Every Time
Over the years, I’ve picked up several tips that can elevate your candle-making from good to exceptional. One of the most important is to pay attention to temperature. Soy wax has an ideal melting and pouring range, and respecting these temperatures can make all the difference. If you pour when the wax is too hot, it may cause sinkholes or frosting on the surface. If you pour when it’s too cool, the wax may harden unevenly. Using a thermometer helps you hit the sweet spot every time.
Another tip is to test your fragrance load before committing to a large batch. While soy wax can hold a generous amount of fragrance, adding too much can overwhelm the wax and cause performance issues. I suggest starting with about one ounce of fragrance oil per pound of wax and adjusting based on your preference. For weddings, I often create small test candles first to make sure the scent complements the overall atmosphere of the event.
Container choice also matters more than most beginners realize. Heat-resistant glass jars or tins are safe and reliable, but don’t be afraid to get creative. I’ve used vintage cups, seashells, and even hollowed coconuts to create candles that fit a couple’s unique theme. Just be sure the vessel can withstand heat and won’t crack under pressure.
Finally, patience is key. Candle-making is as much an art as it is a science, and sometimes your first attempt may not be perfect. Don’t be discouraged by minor imperfections—they often add character. With practice, you’ll develop a feel for the process and gain confidence in customizing candles to suit your needs. I still remember my early attempts, and while they weren’t flawless, they sparked a love for candle-making that has enriched both my career and my clients’ experiences.
Creative Variations of DIY Soy Candles
One of the joys of working with soy candles is how versatile they are. Over the years, I’ve had the pleasure of creating candles in countless styles to fit different wedding themes, and each variation added a unique touch to the celebration. With a little creativity, you can take your homemade candles beyond the basics and turn them into statement pieces.
Layered candles are one of my favorites. By pouring wax in stages and alternating colors or scents, you can create beautiful layers that look just as striking as they smell. Imagine a candle that transitions from soft blush to ivory, perfectly matching a wedding’s color palette. Guests notice details like this, and it’s often those little elements that make a wedding memorable.
Another variation is experimenting with scent combinations. For weddings, I often blend lavender with vanilla for a soothing, romantic aroma, or pair citrus with eucalyptus for a fresh, uplifting fragrance. By layering scents, you can create a signature candle that feels personal and exclusive. The key is to test small batches to make sure the fragrances complement rather than compete with each other.
The choice of container also opens endless possibilities. Decorative glass jars, rustic tin cans, and even seashells can be transformed into candle vessels. For one beach-themed wedding, I used starfish-adorned jars filled with soy candles, and they became the centerpiece of the décor. Don’t underestimate how much impact a creative container can have—it’s often what makes your candle feel one-of-a-kind.
Common Mistakes Beginners Make (and How to Avoid Them)
Candle-making may look simple, but like any craft, it has its challenges. I’ve seen beginners make the same mistakes time and again, and the good news is, they’re easy to avoid with the right guidance.
One of the most common issues is not centering the wick properly. An off-center wick will cause uneven burning, leaving wax along the sides of the container and shortening the life of your candle. Always take a moment to secure the wick in place and double-check its alignment before pouring wax.
Another mistake is pouring wax at the wrong temperature. Pouring too hot can cause surface imperfections like sinkholes or frosting, while pouring too cold can trap air bubbles. Using a thermometer ensures consistency and saves you from frustration later.
Overloading fragrance is another misstep I often see. While it’s tempting to add more oil for a stronger scent, too much can interfere with how the candle burns. Stick to the recommended fragrance-to-wax ratio and test your results before scaling up.
Lastly, many beginners move their candles while they’re cooling. This can cause uneven surfaces or cracks in the wax. As difficult as it may be, leave your candles undisturbed until they’ve hardened completely. Patience here will reward you with a smooth, professional finish.
Safety Precautions to Keep in Mind
Safety is something I never compromise on, whether I’m making candles for a wedding or teaching a client how to make their own. Working with hot wax and open flames requires care, but with a few simple precautions, the process is safe and enjoyable.
Always melt wax using a double boiler rather than direct heat. This prevents scorching and reduces the risk of overheating. Keep a thermometer nearby so you can monitor the temperature closely.
Work in a well-ventilated area, especially when adding fragrance oils. While most are safe, strong concentrations can sometimes feel overwhelming if you’re in a confined space.
Never leave melting wax unattended. Just as you wouldn’t walk away from a stove, you shouldn’t leave wax heating without supervision. And always have a heat-resistant surface ready for placing containers or tools.
Finally, when burning your finished candles, remind yourself and others of basic candle safety: never leave them unattended, keep them away from flammable items, and always trim the wick before lighting. These simple habits keep the candle-making process enjoyable and worry-free.
How to Store and Care for Homemade Soy Candles
Once your candles are made, proper storage is key to keeping them in excellent condition. I often advise clients to store their soy candles in a cool, dry place, away from direct sunlight. Exposure to heat or sun can cause soy wax to soften or discolor over time.
Covering the candles, either with lids or protective wraps, helps preserve their scent and prevents dust from settling on the surface. If you’re making candles well in advance of an event like a wedding, this step ensures they’ll still look and smell fresh when the big day arrives.
Soy candles generally age well, but like all natural products, they perform best when used within a year. I encourage couples to make their candles a few weeks or months before the wedding to strike the perfect balance between curing time and freshness.
Creative Ways to Package and Gift Your DIY Soy Candles
Soy candles also make thoughtful gifts, and I’ve seen them bring joy to wedding guests time and again. The way you package them can elevate the experience and leave a lasting impression.
Glass jars tied with ribbons that match the wedding colors create a coordinated and polished look. For rustic themes, I’ve used burlap wraps and wooden tags engraved with the couple’s initials. Personalized labels are another charming touch—they not only make the candle look professional but also serve as a keepsake for guests to remember the occasion.
I also love creating candle gift sets, where guests receive two or three small candles in complementary scents. This adds variety and makes the gift feel more luxurious. Presentation is everything, and packaging allows you to showcase the care you put into making each candle.
Cost Breakdown: DIY vs. Store-Bought Soy Candles
One question I often hear is whether making soy candles is truly cost-effective. From my experience, the answer is yes, especially when you’re creating them in larger batches.
A single store-bought soy candle in a decorative jar can cost anywhere from $15 to $30. In comparison, the cost of soy wax, wicks, fragrance oils, and containers often breaks down to just a few dollars per candle. For weddings where dozens of candles are needed, the savings can be substantial.
Beyond the financial aspect, there’s the value of customization. With DIY, you control the scent, color, and container style. No store-bought candle can replicate that level of personalization, which is why I often remind couples that the investment of time is more than worth it.
Sustainability Angle: Why Soy Wax Is the Greener Choice
As a wedding decorator, I’ve noticed a growing demand for eco-conscious choices, and soy candles fit beautifully into this trend. Soy wax is renewable and biodegradable, making it a more sustainable option compared to paraffin wax. Choosing soy candles means supporting a cleaner product that aligns with environmentally friendly values.
I also appreciate how soy candles burn cleaner, producing less soot and fewer toxins. This not only makes them better for the environment but also safer for indoor settings like wedding venues. For couples who want their celebration to reflect both beauty and responsibility, soy candles are an excellent choice.
Troubleshooting Guide: Fixing Common Candle-Making Issues
Even with the best preparation, things don’t always go as planned. Luckily, most candle-making problems are easy to fix once you understand the cause.
If you notice sinkholes forming in the center of your candle, it usually means the wax cooled too quickly. To fix this, reheat a small amount of wax and pour it over the top to fill the gap.
Frosting, which appears as white streaks on the surface, is common with soy candles. While it doesn’t affect performance, it can be minimized by pouring at the right temperature and allowing the candles to cool slowly at room temperature.
If your candle tunnels—that is, burns down the middle while leaving wax on the sides—it often means the wick is too small. Choosing the right wick size for your container prevents this problem and ensures an even burn.
These troubleshooting steps are simple but make a world of difference in producing candles that look and perform beautifully.
Conclusion: Enjoying the Glow of Your Homemade Soy Candles
Making soy candles step by step is more than just a craft—it’s a meaningful process that combines creativity, sustainability, and personal expression. Whether you’re creating them for your wedding, as gifts, or simply to enjoy at home, the results are always rewarding.
As someone who has seen firsthand the atmosphere candles can create, I encourage you to dive into the process with confidence. With the right materials, a little patience, and a willingness to experiment, you’ll soon be making candles that rival even the most expensive store-bought versions. And perhaps more importantly, each candle you make will carry a personal story, making its warm glow even more special.
FAQs About DIY Soy Candles Step by Step
How long do homemade soy candles last?
Most soy candles burn for 30 to 50 percent longer than paraffin candles of the same size. Depending on the container, your candle could last anywhere from 20 to 50 hours.
Can I use essential oils instead of fragrance oils?
Yes, essential oils are a wonderful natural option. Just remember that some oils have lighter scent throws, so testing small batches first is a good idea.
Why is my soy candle frosting?
Frosting is a natural characteristic of soy wax and doesn’t affect performance. Controlling the pouring temperature can help minimize it, but it’s not always avoidable.
Do soy candles need to cure?
Yes, curing for 24 to 48 hours (or longer) allows the fragrance to fully bind with the wax, resulting in a stronger scent when burning.
Can I reuse containers after the candle is finished?
Absolutely. One of the benefits of DIY is sustainability. Once the candle has burned down, clean out the container and repurpose it for another candle or decorative use.